Here at thortful, we know just how special and meaningful flowers can be. Receiving a bouquet of flowers can brighten up our whole week and put a smile on our faces, while buying or picking a bunch to display in our homes can bring the scents and sights of spring right into our living rooms. But who says our enjoyment of beautiful blooms has to end there?
Wearing a flower garland in your hair is not only the perfect way to welcome the start of summer, but it allows you to look summery and fresh all day long! Maybe you want to freshen up your look, or decorate your hair with flowers for a special occasion like a wedding, anniversary or engagement party. Maybe you’d like to spend a lovely afternoon picking flowers in the park or garden with your children or grandchildren, finished off with a craft afternoon making flower garlands for them to wear for the rest of the day.
Whatever the reason you want to make a beautiful flower garland, you’ll be an expert by the time you’ve finished reading out handy how-to guide. Whether it’s summer or autumn, winter or spring, you’re sure to find the perfect flowers to create a garland of flowers that you love.
An ideal way to pass the time with arts and crafts, making flower garlands is bags of fun, and they add the perfect finishing touch to any special outfit. Give it a go with our step-by-step guide.
1. Pick your flowers
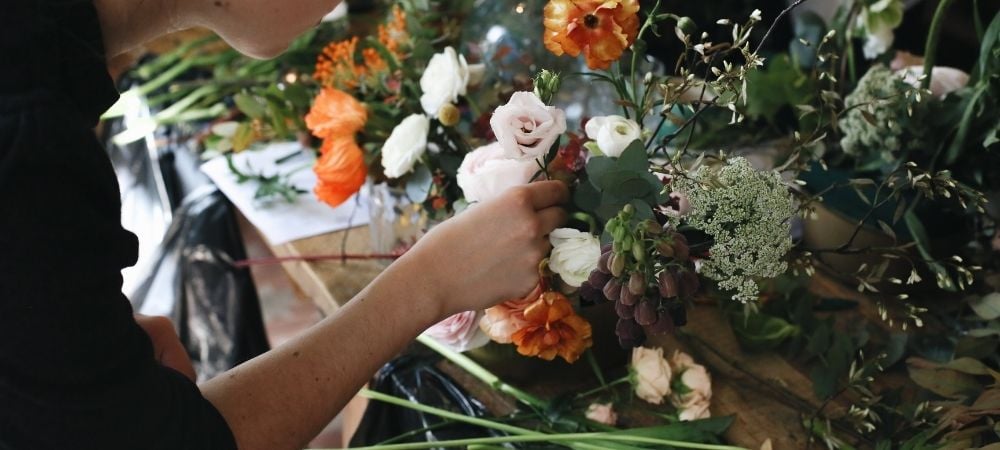
One of the most fun parts of making a flower garland headdress is picking the flowers! Consider carefully the colour palette you want to go for, particularly if you’re going to wear your flower garland for a special occasion with a fixed colour scheme. The types of flowers available for your headdress will also depend on the season. If it’s autumn, for instance, your flowers will likely come in earthy shades, but if it’s spring or summer, your garland could include pastel and brightly coloured flowers. Don’t forget to pick some foliage to help pad out your flower garland and add some greens to your colourful design, and if it’s autumn or winter, you might even consider adding some red or green berries for extra seasonal detail.
2. Plan your design
The next job is to plan the design of your flower garland. It’s easiest to plan your design on paper before you get going, because that way you can be sure that your flower garland will come out exactly as you hope. Don’t forget to include flowers that match your desired colour palette, as well as suitable foliage, and make sure that your prettiest blooms sit at the front of your headdress for all to see! Once you’re happy with your design, it’s time to get your hands dirty and get making!
3. Create your frame
To create the frame of your flower garland, you will need floristry wire and floristry tape, which can be purchased from all good craft shops. You will need to twist one length of floristry wire around another, leaving you with one sturdy piece of floristry wire. Following this, wrap your length of wire with green floristry tape and bend each end into a hook shape. Voila, you have the frame of your headdress! Before you move onto the next step, make sure the flower garland fits by wrapping it around your head. If it’s a little on the long side, cut it down to size.
4. Wire your flowers
The next step in making your flower garland headdress is wiring your flowers. Push your floristry wire, preferably in a nice shade of green rather than silver, into the stem of each of the flowers you will use, and then cut the wire down until it is about two inches long. After that, thread a length of floristry wire through the base of your flowers and then wrap it around the flowers’ stems. Once each of your flowers is wired and secure, you are ready to start adding them to the frame you made earlier.
5. Add the flowers to the frame
Starting at the ends of the length of floristry wire you used to form the frame of your flower garland, begin adding your flowers following your chosen design. Wrap a piece of floristry tape around each wired flower and attach them to your frame one by one, making sure to evenly distribute different types of flowers and foliage for an evenly weighted and beautiful flower garland. Once the entire frame is covered with your flowers, you’re ready to bend it into shape and try it on!
6. Model your flower garland
At this point, your flower garland is almost ready to wear, and can be tried on with the outfit you’ll wear on a special occasion. Firstly, pop the headdress onto your head and bend it into a shape that you are happy with. Then, using the two hooked ends of the frame that we fashioned earlier, fasten the flower garland together securely. After all, the last thing you want is it coming undone at the worst possible time, while you’re on the dance floor or walking down the aisle! Last but not least, model your flower garland and sit back and relax knowing you look absolutely stunning!
Top tips for making a flower garland
- When you pick your flowers, make sure to get their stems as well as their heads. You’ll need at least two inches of stem in order to wire your flowers so that they can be attached to your wire frame.
- Don’t make your flower garlands months in advance of the event or special occasion on which you want to wear it. Unfortunately, flowers don’t stay fresh for very long, so the longer they sit on your flower garland the more they will wilt.
- Use flowers that have just bloomed for the best results. Older flowers will have a shorter life span than fresh ones.
- If you want to wear your flower garland again and again, you can make it using artificial or pressed flowers, but remember than it won’t look as natural or lifelike as one made with fresh flowers from the garden or local park.
Flower crowns are super easy to make, and are a great way to get a summery feeling! If you’re still struggling to decide which flowers to put in your crown, then discover what your favourite flower says about you; or if you want to continue getting crafty, take a look at our how-to guides.